You are currently viewing a course sample, but you’re not yet a member! Only certain modules will be available to you. To sign up for a membership to access the full course, check out our Plans and Pricing or Login
What Do All the Numbers Mean?
One of the most common difficulties people have when preparing to buy a speaker is understanding what the specs actually mean. If I buy speaker X, will it work with speaker Y? Is the $400 speaker better than the $200 one? These are the questions the specs help answer.
A Refresher:
Before we move forward, I want to bring back two important charts that you’ve already seen, but they are important to have for reference.
First here is a frequency chart (from 20hz [low frequency] to 20Khz [high frequency]) along with approximations of where each instrument covers along the spectrum. Once we get into numbers, this will help give you a reference point for key frequencies.
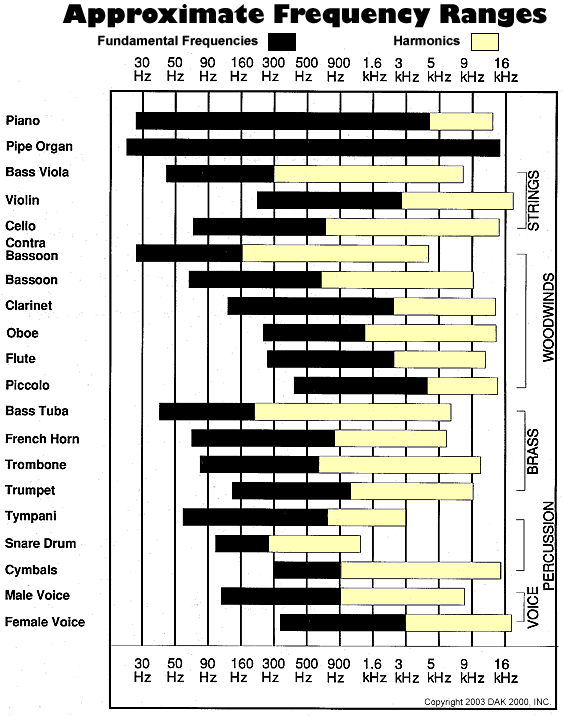
Image Courtesy of Polk Audio Forums
We also have a decibel (db) chart.
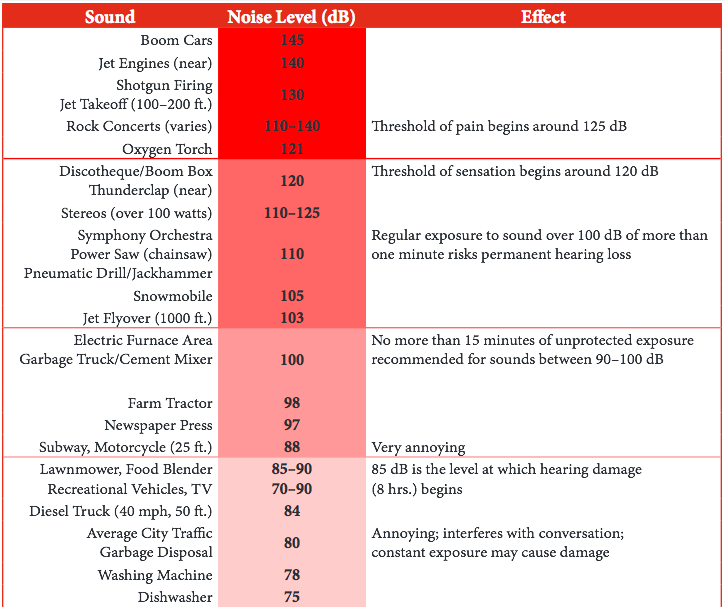
Image Courtesy of National Institute on Deafness and Other Communication Disorders
Feel free to scroll up and use these for reference throughout this module.
An Example
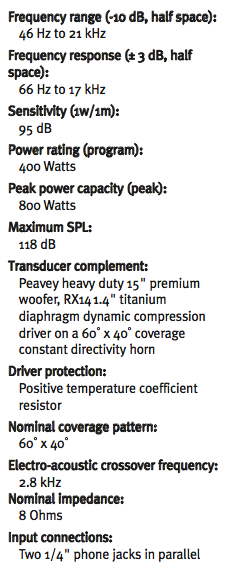
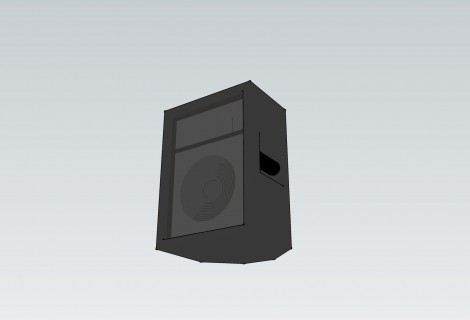
These are real specs pulled off a real speaker available on the market today. This particular speaker is a two way speaker (meaning only one low and one high frequency driver). The low frequency driver is 15” in diameter, and the speaker is passive (so it needs an external amplifier to power it).
Alright, here we go:
Metric #1: Frequency range (-10 db, half-space)
46 Hz to 21 Khz
First, understand that this is a frequency measurement. So it effectively measures how the speaker responds over a given range of frequencies. This metric tells us that from 46 Hz to 21 Khz, the speaker will produce some sound DETERMINE WHAT THE -10 DB STANDS FOR!!!
When the specs refer to “half-space”, it means that the loudspeaker was tested in an environment with just one boundary. By boundary, we mean one solid surface (most likely the ground). Full-space would refer to testing a speaker with no boundaries (imaging flying a speaker 3 miles into the air and testing it). There are no other surfaces for sound to reflect off of. Half-space means testing with only one surface around. Imagine the middle of a field or a desert.
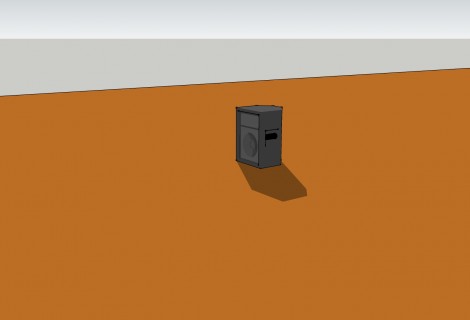
This is an example of a speaker in half-space. There is only one plane that is solid around the speaker (in this case, a floor).
With a speaker measured in full-space, just imagine a speaker suspended miles in the air with no floor, walls, or ceiling around it. In reality, manufacturers measure this sound by putting the speaker into anechoic chamber where no sound is reflected.
Why is this important? Walls, floors, and other hard surfaces tend to reflect sound. A speaker tested in a half-space (one surface) environment would measure louder than a speaker tested in a full space (no surface) environment. The half-space measurement tends to reflect how a speaker might be used in an outdoor environment. Almost never will you use a speaker in a true full space environment, so half-space is a useful measure for us to use.
So overall, this metric doesn’t look too bad. After all, this is a lower priced speaker (~$230 USD). But let’s dig in a little deeper.
Metric #2: Frequency Response (+/- 3 db half-space)
66 Hz to 17 Khz
Wait…I thought we’d already talked about frequencies. So what is this?
The previous metric was frequency range. It was simply measuring any possible range at which the speaker could produce any sound. That metric isn’t super helpful to us because some frequencies may be way louder or softer than others. This frequency response metric is much more useful. Let’s break it down.
First, let’s understand what the +/- 3 db portion of the metric means. This tells us that over the given range (in this case 66 Hz to 17 Khz) there will only be up to a 6 db change. Now 6 db is quite a bit, but it still gives us a more solid metric than the previous one.
So restated simply this tells us:
Over the range of 66 Hz to 17 Khz, there will only be a 6 db change between the loudest and the quietest frequencies. This means that 15 Khz could be up to 6 db louder than something at 70 Hz. However within this range, there is never a change greater than 6 db.
So why did the frequency range’s low frequency chart stretch all the way down to 46 Hz while the frequency response only goes down to 66 Hz? Although the speaker may be actually able to reproduce a note at 46 Hz, that note will either be so loud (unlikely) or so quiet (much more likely) that it isn’t super useful. What good is a speaker that produces a note at 46 Hz if it sounds half as loud as a note at 66 Hz.
So the most useful metric to us is the second one (66Hz-17Khz). Although the speaker technically has range all the way down to 46Hz and all the way up to 21Khz, we only find a real useful range between 66Hz and 17 Khz.
To help solidify this idea, check out this video to help explain :
Why report both? It’s really just marketing. A loudspeaker that reaches all the way down to 46Hz looks really good on paper. The problem is that in the real world this speaker isn’t incredibly useful at those frequencies. But if your competitor is using this metric, he can make his speaker seem way better than yours – even if it involves some slight deception in the numbers. This is why it’s important to understand exactly what the numbers mean.
Metric #3: Sensitivity
Sensitivity (1w/1m): 95 db
Sensitivity effectively measures how effective a loudspeaker is at taking electrical energy and turning it into acoustical energy. To conduct this test, an engineer sets up a microphone one meter away from the loudspeaker and then puts one watt of electrical power through the speaker. The resulting number (in this case 95 db) is how loud that tone is. Efficiency is important to note, but this metric can also be skewed to make a particular speaker look better or worse, so do not put a huge amount of value on this number unless it is either significantly higher or significantly lower than competitors. Most people (even excellent engineers) are never going to notice a slight change in this number.
Metric #4: Power Rating (Program)
Next to frequency response, this is probably the most important rating on the box. This measurement tells you how much electrical energy a speaker can handle without breaking. In this case, this speaker is able to handle 400 watts consistently. This means you could take a solid tone and push it through at 400 watts and the speaker would be fine. Typically the more watts a speaker can handle, the louder it will go. Although this metric isn’t perfect, it is a good rule of thumb.
However don’t be tempted to think that speakers that handle higher wattages are always better. Sometimes cheap speakers will be really good at taking a lot of electrical energy, but they aren’t as good at reproducing it into acoustical energy (sound waves). Also, even if the speaker is LOUD doesn’t mean that it sounds good. So don’t just go buy a higher wattage speaker without doing other research. There are many factors, and wattage is just one of them.
Metric #5: Power Rating (Peak) [Known here as Peak Power Capacity]
This is another metric that is generally put here just to make the speaker look better on paper. In this case, the speaker peak power is 800 watts. That just means that occasionally the speaker could handle a power surge (usually due to a percussive sound like a kick drum or snare drum) of up to 800 watts without blowing a driver. However, it is not good on your speakers to often put them into this peak range. It’s far better to have all the power you need in the RMS range. You’ll tend to get better sound, and you’ll be less likely to blow a speaker or an amplifier.
Metric #6: Maximum SPL
This is the absolute loudest that a speaker can go. If this speaker is pushed to the max, it will not produce more that 118 decibels. This is again a useful metric to know, but not incredibly useful as there are a variety of factors impacting the way SPL works in the real world.
Metric #7: Transducer Complement
This section just tells us a little about the actual components of the loudspeaker. It tells us that the low frequency driver (woofer) is 15” inches in diameter and the high frequency driver (tweeter) is a dynamic compression driver. It also happens to give us the coverage pattern (60 degrees by 40 degrees) which is a useful metric to know, but we’ll talk about that in just a few minutes.
Metric #8: Driver Protection
You’ll see this metric on some speakers, but not all. It basically informs us that there is a tiny device inside the loudspeaker that increases resistance as it heats up. This helps ensure that if you’re driving the speaker hard, it doesn’t just melt down. Driver protection is a nice feature to have, but if you buy and install the right kind of system in the first place, you should never need it.
Metric #9: Nominal Coverage Pattern
This is another very important metric to understand as you begin to set up your sound system. This metric tells you how wide and how tall the speaker coverage is. In this case, the speaker’s coverage is 60 degrees wide. This means if you put a protractor in the middle of the speaker and measured out 30 degrees each way (for a total of 60 degrees), you’d find your nominal coverage pattern. This may sound confusing, but I think a graphic will help explain:
Likewise, if you took a protractor and put it right in the middle of the speaker and measured off 20 degrees each way (for a total of 40 degrees), you’d see how the coverage pattern of a speaker looked.
Take a look at a visual representation of coverage patterns in a typical speaker system:
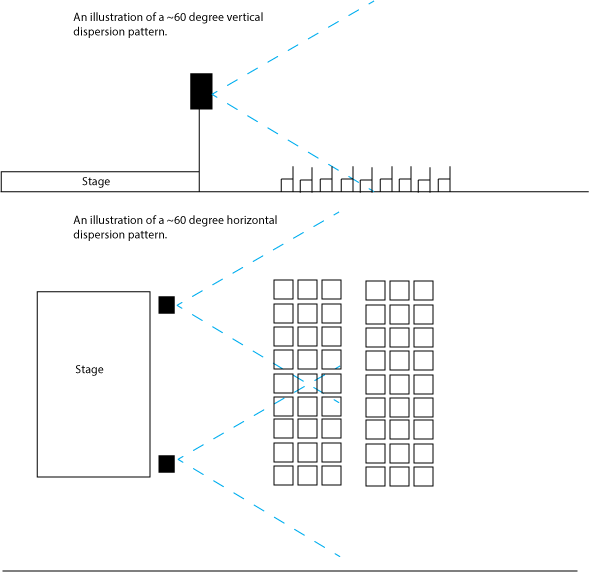
So why is this important? Well, if members of your audience are not within the coverage pattern, they aren’t going to get the best sound. Chances are, you’ll lose a lot of the high frequencies and clarity and everything will sound boomy. If you’ve ever been near an outdoor concert, but not actually in the audience, everything sounds bassy and far off. The low frequencies (because of their longer wavelengths) are much less directional, meaning that when you get outside of the nominal range, you’ll hear far more bass than you would otherwise.
So to put this in perspective, let’s take a look at what might happen should we use these speakers in a typical set-up on their own.
Video breaking down using the speakers, stage and dead coverage area in the center.
Metric #10: Electro-acoustic Crossover Frequency:
Inside each speaker that has multiple drivers, there is a crossover. As previously mentioned, crossovers divide up the signal at certain points to determine which frequencies go to which driver. In this case, the crossover point is 2.8kHz. Anything above this frequency goes to the tweeter while anything below goes to the woofer. No speaker has a perfect crossover, but most do an excellent job with making a smooth crossover transition.
This metric is most important when you begin using a separate subwoofer. You want to cross over your subwoofer at a point that isn’t too high (then it will be muddy) nor too low (then you make your regular speakers work too hard). We’ll talk more about subwoofers a little later.
Metric #11: Nominal impedance:
Impedance is another important metric when thinking about speakers. Although we don’t have time to address it in depth here, there is a basic rule to follow when wiring speakers.
If you’re wiring speaker in parallel (also known as daisy chaining), every time you put another speaker in the chain, you cut the resistance in half. So two 8 ohm speakers wired in parallel means that you’re driving an amplifier at 4 ohms.
This is confusing now, I understand, but we’ll break it down in more detail when we get to the amplifiers section. It’ll make more sense then. Also, if you’re in the process of setting up a system right now, be sure to check that section out. Wiring speakers wrong can destroy an amplifier – and that’s bad!
Metric #12: Input Connections:
This particular speaker has two 1/4 inch inputs wired in parallel. This means that you can run a ¼ in cable from your amp to the first speaker and then loop it out of the second connector to another speaker.
Other common speaker connections include Speakon (NL4). Occasionally you’ll find a specialty system that will accept banana plugs, direct wiring, or some other specialty connector, but systems today use either NL4 or 1/4 inch jacks. If you are using some other jack, be sure to refer to the owner’s manual about proper connectivity, as the polarity (positive and negative electrical signals) do impact performance significantly.
Other Metrics:
Most other metrics you’ll see on a typical speaker have to do with the physical characteristics of the speaker itself, the products it is made of, and its physical dimensions. These metrics do impact performance and durability, but there are so set rules or requirements about which are best.
Final Thoughts:
All of these metrics have been quantitative (meaning that you can put a number to them). Since many people judge a sound system exclusively by quantitative metrics, manufacturers work hard to give their speakers the best stats possible. They often optimize test environments to non-realistic conditions in order to help their speakers look better on paper. This isn’t to make speaker manufacturers sound sleezy, but it is an incredibly competitive environment.
Since comparing numbers isn’t always a true “apples to apples” comparison, there is no better way to test a system than to actually hear it. Just because something is loud doesn’t mean it sounds good. And just because it looks good on paper doesn’t mean it performs as effectively in real life.
If you’re buying a small system for a band or mobile PA, go to the music store and listen to every single speaker you can. Look at the numbers, but also just listen to how the box sounds. Compare everything you can in order to begin to understand the subtle differences that the numbers don’t capture accurately.
If you’re buying a large system or preparing to do a permanent install, talk to manufacturers and have them bring out systems for you to demo. Ideally, you want to hear the exact system you’d like to install in your own room. The room impacts the sound drastically, so try and get systems set up to test in your space.
So the numbers are important, but if you only use numbers to pick a system, you’ll miss some important opportunities.
Well, that’s it for loudspeakers for now! Now on to amplifiers!
[kkstarratings]