You are currently viewing a course sample, but you’re not yet a member! Only certain modules will be available to you. To sign up for a membership to access the full course, check out our Plans and Pricing or Login
And We Have Arrived!
We’ve finally made it to the mixer! Many future modules will include discussion about the mixer (or mixing console as it’s sometimes known) and its various features and functions, so it’s important to have a solid, foundational understanding of what a mixer does and how it works.
Mixing It All Together:
The mixer provides three primary functions for the sound system:
-
Appropriately mix various inputs together
-
Take all inputs and convert them into appropriate line level signal to send to the amplifiers
-
Provide a central control to mute and select appropriate inputs and outputs
The mixer is also one of the most intimidating parts of a system – there are dozens of knobs and faders. How can anyone possibly understand what they all do? It’s not quite as bad as you think. So let’s get started.
The Channel Strip:
The fundamental building block of every mixing console is the channel strip. Typically each input channel on the console has its own channel strip. These channel strips are each identical to each other (with the exception of some stereo inputs). A channel strip of an entry level console is usually made up of the following sections
- Preamp
- Input Gain
- Equalization (EQ)
- Aux Sends
- Pan
- Mute (or “On”) Switch
- Channel Fader
Some channel strips have additional buttons, switches, and features that we’ll cover later, but these are the basic building blocks of every channel strip. We’ll break each of them down in order to understand its impact on the electrical signals traveling through that channel.
Here is an example of channel strip on a simple mixing console. We’ll break down each of the major sections below:
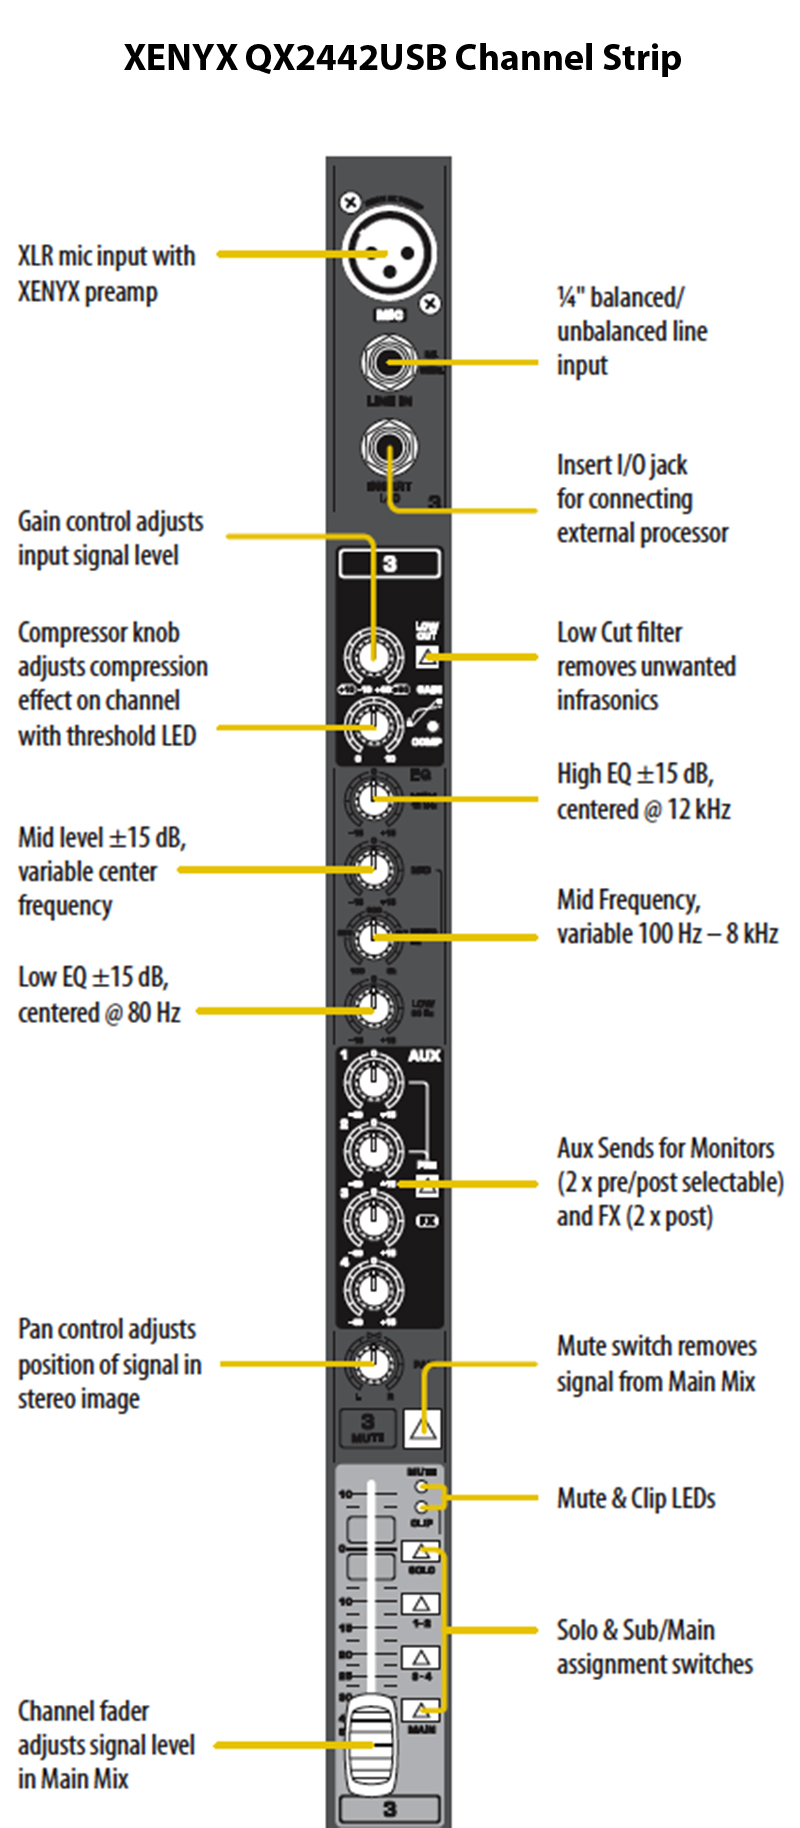
Image Credit: ProRecording.org
Preamp:
If you connect a mic (either directly or through a snake) to the console using the XLR input, the signal immediately goes into the preamp. The preamp is responsible for boosting the signal to a level that is appropriate for the rest of the channel strip’s processing.
Preamps are also heavily responsible for the “warm” sound many sound engineers covet. Expensive live (and especially) studio consoles tend to have a very subtle warmth. Much of this comes from the preamp.
Usually the preamp will also let you select whether you want phantom power turned on or off. The switch or button is usually labeled “Phantom” or “48v”. Most condenser mics require this phantom power, but dynamic mics do not. If you get the opportunity to use a ribbon mic, be sure phantom power is turned off otherwise you may fry your expensive microphone. It is a good rule to leave phantom off on whatever channels do not require it. That way you don’t break any of the connected mics or instruments.
Preamp Gain:
The first knob you’ll see at the top of the console is the gain knob (sometimes called trim). Gain allows you to boost the electrical signal to the proper level when it hits the preamp. Setting proper gain structure across all the channels is a science in itself, but the secret is to getting the signal boosted to just before clipping on the loudest notes.
If you set the gain too high, your input will distort and it will ruin the sound. Set the gain too low and you won’t be able to get the proper level out of the input without adding a significant amount of noise. We’ll talk more about gain structure in a later module, but in order to get the gain set properly you have to get it just right.
Low Cut Filter:
The low cut filter is a special part of the equalizer. By putting this button in the “on” position, the console removes the lowest frequencies from that channel. Depending on the console, most low cut filters cut out everything below a certain frequency. Usually this cut-off point is somewhere between 80 and 120 Hz.
Compression:
Compression takes the highest points of the waveform (the most dynamic portions of the wave) and reduces them by a certain ratio. Basically it can take a sound (like a voice) and make it sound more even through loud and soft parts of the mix. We’ll break down compression in depth later.
Equalization:
From here on, we’ll just refer to this as the EQ section. Many books and articles have been written on EQ, and many engineers have spent years trying to master the fine art of setting up EQ for specific channels. However, here we are just going to give you a quick overview.
Almost all consoles have a parametric equalizer built in. Unless you already understand what a parametric equalizer is, the knobs won’t make any sense. Parametric equalizers usually have at least three settings:
- Level – This is how much you boost or cut certain frequencies
- Frequency – This is the center frequency that will be adjusted.
- Width or Q – This is how many of the surrounding frequencies are impacted when you boost or cut your center frequency.
We’ll talk about about the EQ more when we dig into the channel strip module.
Auxiliary Sends:
Auxiliary (aux) sends are a powerful feature on any console. An aux send is like having a whole other mixer present. While you mix the main output, you can also adjust the volume on separate outputs. One of the most common uses for aux sends is to mix monitors. By having a separate output dedicated to monitors, an engineer can provide the performer with more of what they desire without significantly changing their main house mix.
To help illustrate, take a look at this diagram:
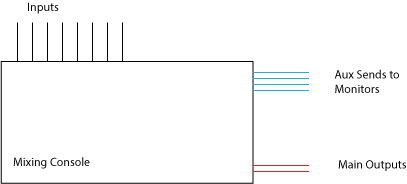
The main output (red lines) levels are controlled by the faders on each channel. Then using the aux sends, you can create totally separate mixes. These are indicated by the blue lines. As an example, one of the aux sends (blue lines) could go to a monitor for the lead singer. This means you can independently adjust the level of each instrument in that aux send. Aux sends basically take your single mixer and allow it to create many different, independent mixes.
Many Aux sends can also be either “Pre” or “Post”. This is referring to where they fall on the signal path. “Pre” stands for “pre-fader” meaning that the level of the fader has no impact on the level of the output. You could have the fader all the way down (at -infinity) and an Aux in pre-fader mode would still send signal.
Post-fader aux sends will send an output level that is based on the fader position on the console. Meaning as you push up the fader, the output level on that aux will also increase.
Pan:
Most stereo enabled consoles have a pan knob. The pan knob allows the engineer to determine how loud the channel is on each side of the stereo field. Simply put, the pan knob determines how much of each channel goes into the left speaker and how much goes into the right speaker. On some consoles, the pan knob also has some additional functions when linked to a bus, but we’ll be discussing busses in the channel strip module.
Mute Button:
This is like an on/off switch for the channel. When the channel is muted, you can leave the fader up, but it still will not send any signal through the fader to the master section of the console. Depending on the console setup, the mute button may also turn off the post-fader aux sends.
Mute and Clip LEDs:
The LED lights on the channel show you what is happening on the channel. The mute button illuminates when the channel is muted or “off”. This allows you to quickly assess which channels are muted and which are not.
The clip LED illuminates when you’re clipping the preamp input. This means your gain is too high, and you should turn it down until the clip light no longer lights up.
Solo Switch:
The solo switch takes than channel and isolates it in your FOH monitors or headphones. This allows you to just listen to a single instrument without impacting the overall mix. If you’re trying to isolate an instrument to EQ it or find the source of noise in a system, this button is one of your best friends.
Sub/Main Assign Switches:
When you select the “Sub” switch, it routes that particular channel to a bus mix. We’ll talk more about this in our Bus Mixing module, but suffice it to say that it allows you to allow two or three channel levels to be controlled simultaneously by a single fader.
When you select the Main assign switch, it sends that channel to the main output of the console. If you’ve hooked up your console, but you’re not getting any signal out of the main output, make sure this switch is selected on the channels you want to send to the main output!!! Many times this will be your problem.
The Channel Fader:
This is perhaps the one control on a mixer that everyone seems to know. The channel fader is the final stop before the electrical signal leaves the individual signal chain and moves to the master section of the mixer. The channel fader is basically a volume control for that channel.
The level of the fader is measured in decibels. At the bottom the fader is at -infinity, meaning that no sound actually gets through the fader. As you begin to bring the fader up, you eventually get to 0 db. On some consoles this setting is known as unity. When the fader is set at unity, it means that the signal is not being boosted or cut. Most channels will run somewhere around unity if the gain is set properly.
The Master Section:
Once the signal leaves each individual channel strip, it then sent to the master section. Some consoles have additional EQ and compression in the master section while others simply have a master fader. Regardless of what the master section on your console looks like, it is the last stop before the signal leaves the console. It is the last opportunity to provide basic processing and to adjust the levels.
In the master section, all the different channels are mixed down into an output. Some consoles have a stereo master section that allows you to separate out the left and the right channels when needed.
Congratulations! You made it to the end of the Parts of a Sound System Module! Next up is the module on Setting Up Your Sound System
Previous Chapter | Course Outline | Next Module
[kkstarratings]You’ve reached the end of the free content. We hope you learned something! To sign up for a membership to access the full course, check out our Plans and Pricing or Login