
Building a Cheap In-ear Monitor (IEM) System
One of the most common questions we get is how to build a simple IEM system. Within the past decade, the use of IEM systems has risen significantly as wireless and digital technology has improved. Nearly all major acts today use some type of in-ear monitoring system. Most bands require an IEM system on the rider (or sometimes even bring their own).
The advantages of a good IEM system are numerous. First, they can significantly help reduce stage volume. With traditional wedge monitors, you can easily get a huge increase in stage volume that can even overpower the house mix for the first few rows of the audience. IEMs also provide a ton of flexibility. Do you want to play with a click track to keep up a solid tempo? IEMs allow that without the audience hearing your click. Syncing with a click track allows the band to also play with backing tracks off an iPod or a more sophisticated system such as a laptop running Ableton Live.
However, most good IEM systems are still expensive. You can easily drop over $500 per unit for transmitter and receiver. With a four piece band, you can spend over $2000 for a basic IEM setup. Much of what you’re paying for is the wireless technology. In order to reduce the cost we’ll be create a wired IEM system. It’s not quite as flexible or fun, but it’ll do the trick for many bands.
So how do we create a basic in ear system? I’m glad you asked!
Creating Wired IEMs
First, we’ll be using Aux sends to send signal to our monitoring system. For this example, let’s assume we’ll only using one aux send. If you want to use multiple aux sends to create multiple mixes, you can just duplicate the signal chain across several aux sends, you’ll just need to purchase additional gear.
Here is what our signal path is going to look like:
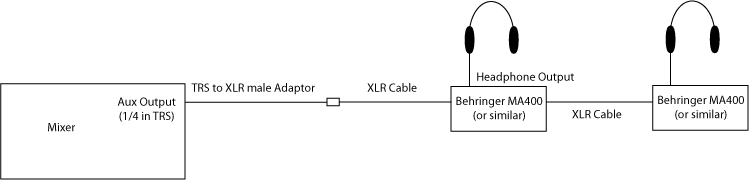
And here is the gear we’re going to need:
- ¼ in TRS to XLR male cable
- 1 long XLR cable (can often be built in as a return on the snake)
- Behringer MA400 (times however many stations you want)
- Short XLR cables (times as many stations you want)
- Your favorite earbuds or headphones (times as many stations as you want)
- Headphone extension cable (times as many stations as you want)
Connecting It Together
First, we’re going to use the ¼ TRS cable from the mixer. Plug this cable into the Aux send for Aux 1 (or whatever aux number you are using).
Then connect the male XLR cable to either a long XLR cable leading back to the stage or an XLR return on the snake.
Side note: If your snake doesn’t have XLR returns, you can use the balanced ¼ in returns built into the snake. Plug the TRS connector from the snake directly into the mixer, then at the snake output (on the stage) connect your TRS to XLR adaptor cable. Everything else will then be the same.
On the stage, take your XLR return and use a short XLR cable to connect to the input on the Behringer MA400.
Using another XLR cable, plug the female end into the “Mic Thru” port on the MA400. Using additional XLR cables and additional boxes, you can create a nearly endless chain of IEM stations.
Ensure that the MA400 unit has power from the 12v adaptor.
Plug your headphones or earbuds into the MA400 and adjust the volume appropriately. You may want to add a headphone extension cable to give the artists more room to move.
Multiple Mixes
And that’s it! Now you have a basic, wired IEM system. Should you want additional custom mixes, you can duplicate this system on additional aux sends. Most 16 channel consoles have 2-4 aux sends allowing you to create several custom mixes. For example, all vocalists might want a mix with the vocals prominent while the drummer might want a mix designed to highlight just the lead vocals and bass guitar. The mix you create is entirely dependent on what your talent can agree upon.
Happy mixing!